Machine Learning Attack Series: Brute forcing images to find incorrect predictions
This post is part of a series about machine learning and artificial intelligence. Click on the blog tag “huskyai” to see related posts.
The previous four posts explained the architecture and how Husky AI was built, threat modeled and deployed. Now it’s time to start the attacks and build mitigations. The appendix in this post shows all the attacks I want to research and perform in this series over the next few weeks/months.
Let’s dive into the attacks.
Brute forcing images to find incorrect predictions
The first attack I investigated is also referred to as perturbation attack throughout the literature I have been reading. It is like fuzzing (dumb or smart) to come up with malicious input that tricks a model. It is probably the first attack that one would think of when faced to hack AI/ML - besides attacking the machine learning infrastructure.
What are we testing?
The target is Husky AI, which we have discussed in the previous posts. The operationalized Husky AI model is accessible over an HTTP endpoint. It’s basically an image upload API, and it returns the prediction score.

If you are curious the code for the simple web server is located here.
To interact with the API I’m using the following code:
ENDPOINT = "https://example.org/huskyai"

def predict(np_candidate):

    #convert numpy array to Image in memory
    img = Image.fromarray((np_candidate*255.).astype('uint8'), 'RGB')
    image_bytes = io.BytesIO()
    img.save(image_bytes, format="png")
    image_bytes = image_bytes.getvalue()

    #call prediction HTTPS API
    file = {
        "file": image_bytes,
        "Content-Type": "image/png"
    }

    response = requests.post(ENDPOINT, files=file)
    return response.json()
What is happening here?
- The
predictfunction takes anumpyarray (a typical python data structure) and converts it to anImage. - The input array comes in with values from
0-1. Hence, we multiply all input values by255and convert to auint8to ensure the random pixels all have values between 0 and 255. - Afterwards the image is converted to
png, and the resultingimage_bytesare added to thePOSTrequest. - If all goes well, the web service returns a
JSONresponse with the prediction as afloat.
That is all that is needed to invoke the HTTP API from Python.
Jupyter Notebook
I’m using a Jupyter Notebook to run these attacks. Over the last couple of weeks, I really started liking the VS Code Python extension.
The validation accuracy of the model was in the mid 80% range and querying the API works well with the Jupyter notebook.
Here are two examples of calls to the API:
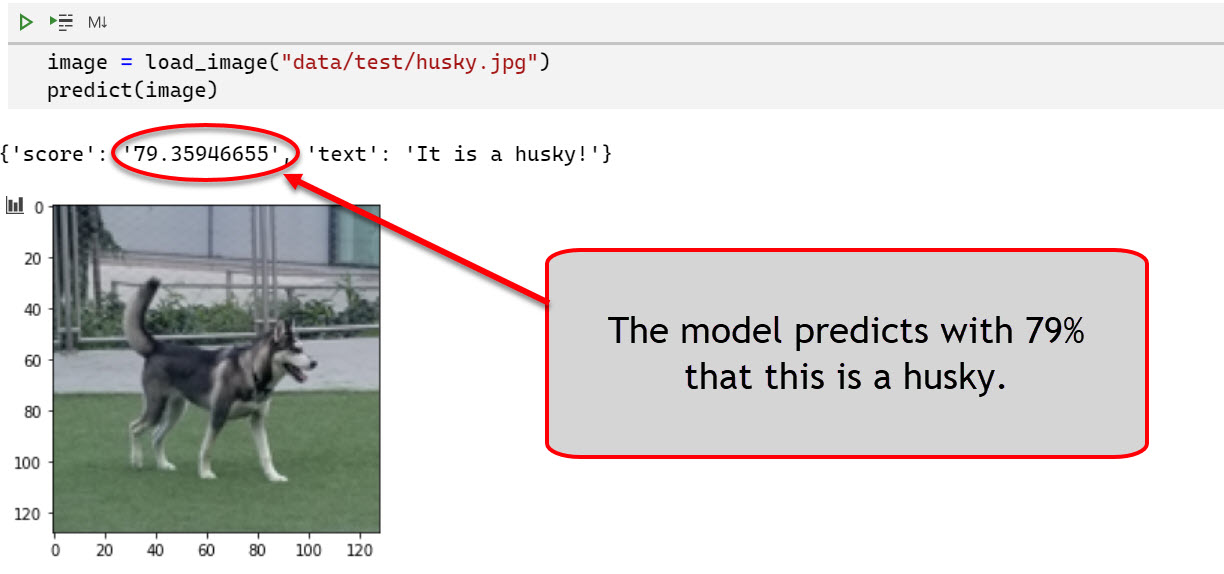
- A picture I took at a dog park identifies this dog as a husky:
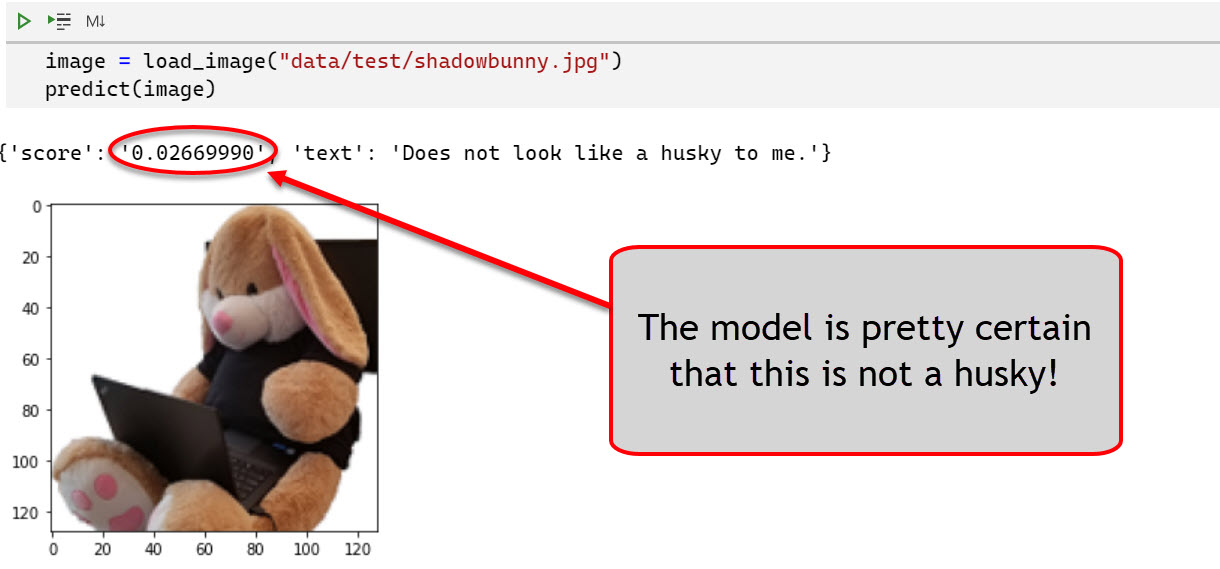
- The Shadowbunny scores low, not being classified as a husky:
Equipped with a model that works decently well (or not, as we will see soon), it’s time to create images to challenge the model.
Simple test cases
When testing software to find bugs, a good strategy is testing boundary scenarios. Hence, I thought of doing the same in this case. With machine learning there are special tools and techniques available, such as adversarial learning models, Cleverhans and others which I want to research and look at later.
The three test cases that seemed interesting initially were all 0, all 1 and images with random pixels.
Here is the code snippet I used to create these test images and run them through the prediction web endpoint:
candidate_rand  = np.random.random([1, NUM_PX, NUM_PX, 3])
candidate_zeros = np.zeros([1, NUM_PX, NUM_PX, 3])
candidate_ones  = np.ones([1, NUM_PX, NUM_PX, 3])

print("Random Canvas: " + str(predict(candidate_rand)))
print("Ones Canvas:   " + str(predict(candidate_ones)))
print("Zeros Canvas:  " + str(predict(candidate_zeros)))
Let us analyze the results in more detail.
Test Case 1: A black canvas
The first image I created was a numpy array with all 0 - which is basically a blank black canvas.

Yep, the result looks like expected.
Test case 2: A white canvas
The second test case was an all-white canvas:
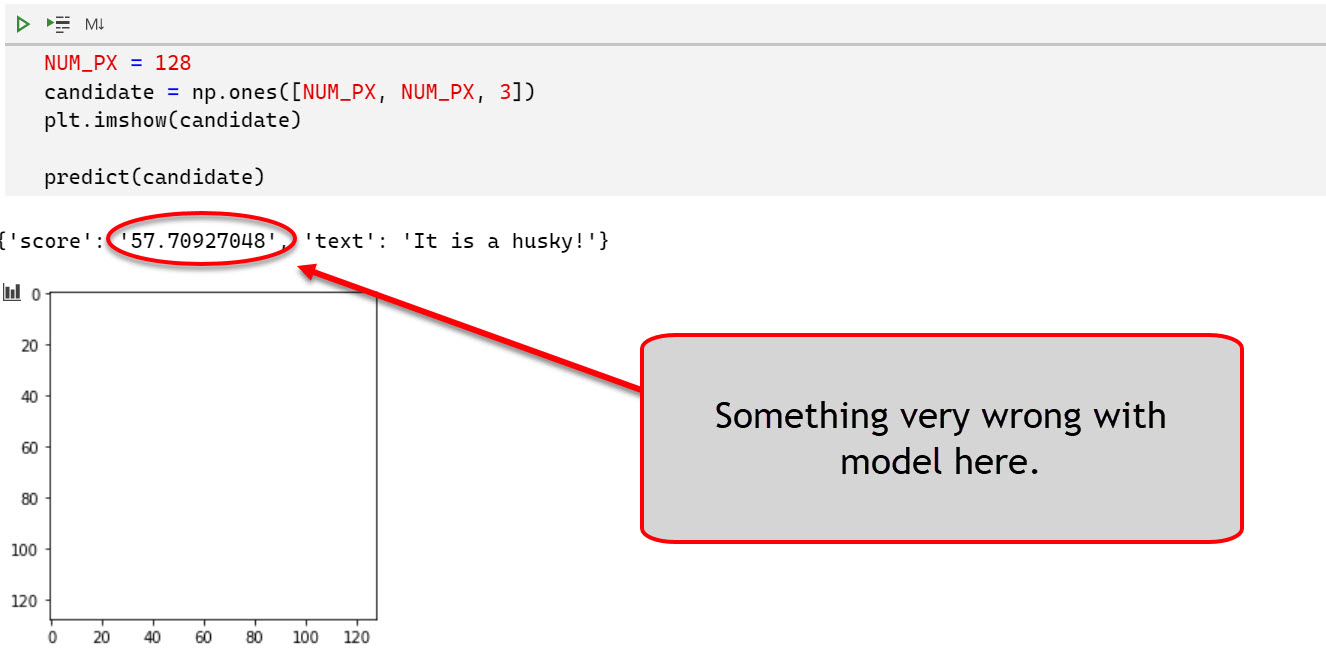
Oh, wow! There is the first successful attack already. Looks like the model has some issues!
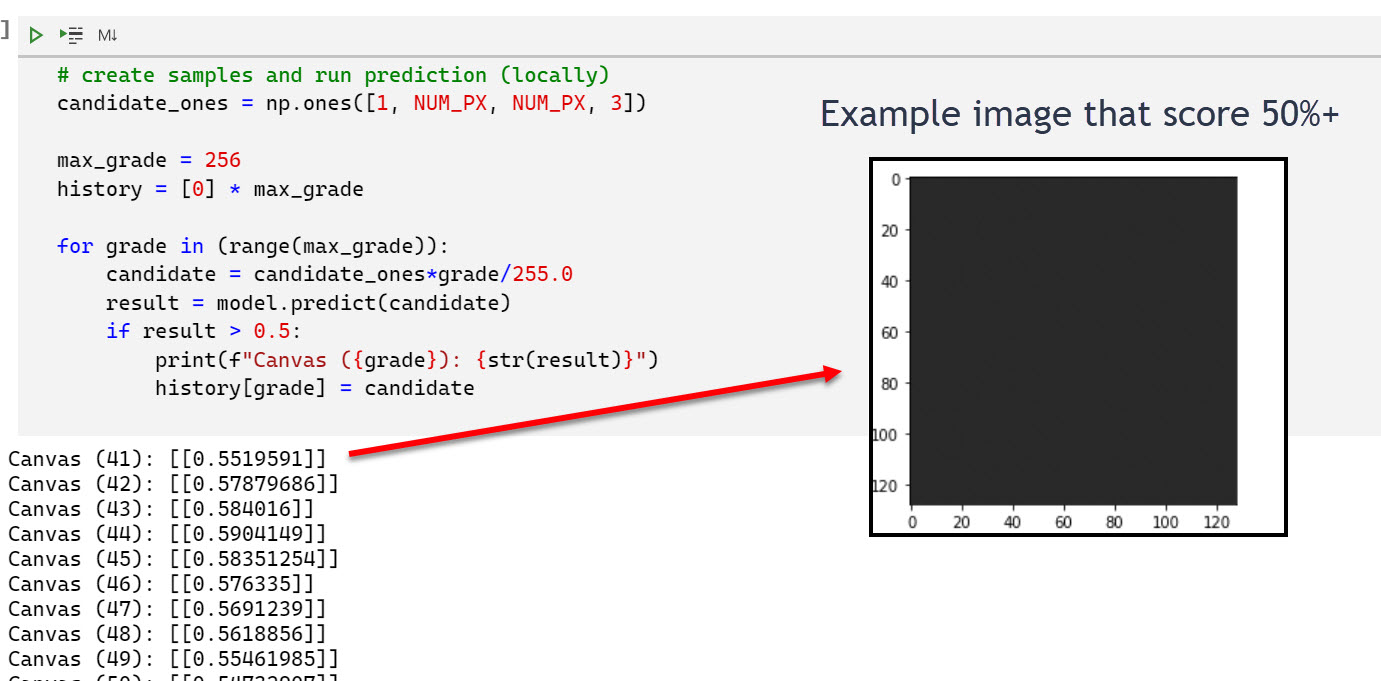
Test case 2.5: Solid colors from 0-255
Since the corner cases gave such drastic results, I went ahead to try the solid shades from 0-255 for all pixels. The results show that there is a range of 30-40 adversarial images that are huskies. So interesting.
There is still one more experiment to perform amongst these simple scenarios.
Test case 3: Images with random pixels
It was quite unexpected that the pervious scenarios already broke the model.
My initial plan was to create many random images in a loop until I get one that scores over 50%. However, this was not really needed. Also, for random images many are identified as husky. Look:
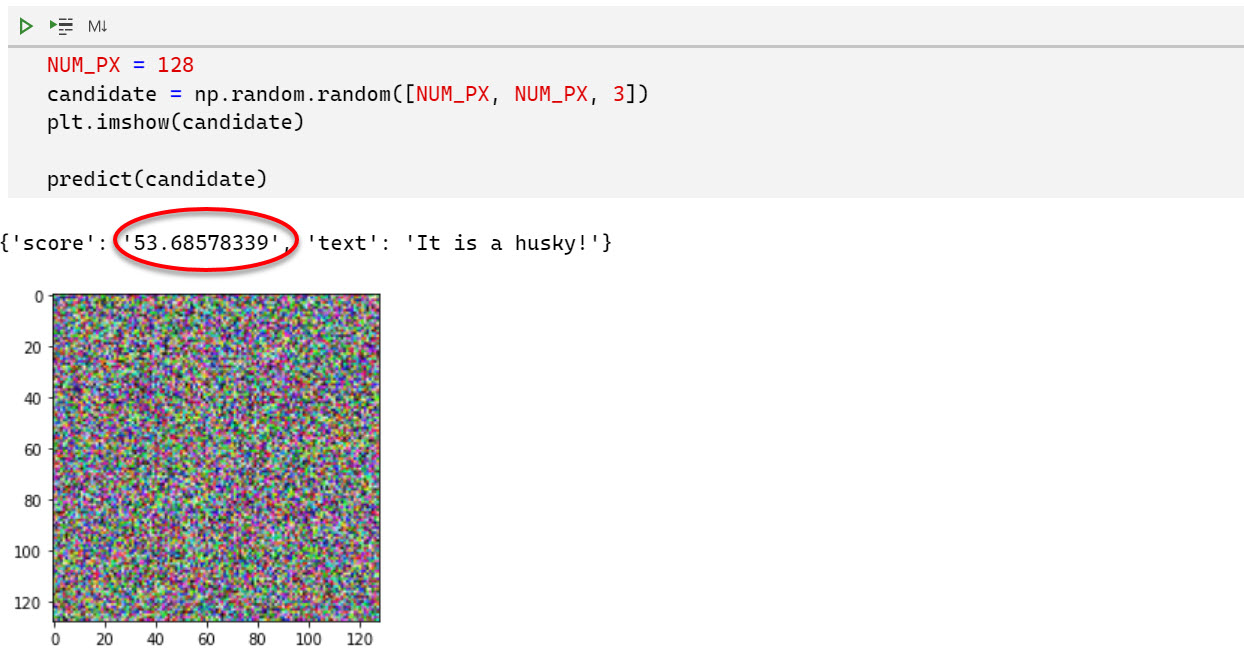
Quite surprising - did not assume that breaking this model would be that easy…
Take-away from the attacks
The initial learning for me here is that having basic “unit” tests for models is a good idea. It will be exciting to try more advanced attacks (includ ML based ones) after fixing these issues first.
Mitigations
Now, let’s discuss how to mitigate these issues, I had a couple of ad-hoc ideas:
- Simple adversarial training: My first thought is to make sure to add these test cases when training the model. This is called “adversarial training”
- Throttle calls to the web server: Not all attacks are feasible if users are throttled when submitting images. Throttling will make successful attacks more difficult for some attackers. As red teamer I’d say its best to assume a motivated adversary has access to the model.
- Interpret predictions slightly different: We could say an image is a husky when the prediction is 60%+
- Improving the model in general: The model’s accuracy is in the mid 80% and a bit overfitted, so there is plenty of room for improvements.
- Transfer Learning A good improvement accuracy wise will be to use “Transfer Learning” and build on top of the shoulders of a more mature model.
The results so far are quite interesting for my learning experience. So, I want to continue that route for now.
Let’s look how I trained the model for these adversarial images:
Adversarial training
The simple mitigation seems to be to train the model on these corner cases and teach the model that such images are not huskies.
This can be done using code like this:
labels = [0,0,0]
images = [candidate_rand[0], candidate_zeros[0], candidate_ones[0]]

print("Fitting model...")
model.fit(np.array(images),np.array(labels), epochs=1, verbose=0)

print("Random Canvas: " + str(model.predict(candidate_rand)))
print("Zeros Canvas:  " + str(model.predict(candidate_zeros)))
print("Ones Canvas:   " + str(model.predict(candidate_ones)))
Since I am experimenting to learn, I only trained for a single epoch initially, here are the results:
Fitting model...

Random Canvas: [[0.25112703]]
Zeros Canvas:  [[7.170946e-05]]
Ones Canvas:   [[0.5275204]]
These number are still bad, so I trained for more epochs. Overfitting did not seem too much of a concern as these images are far off real huskies. I think it would further improve the model to cycle the random pixels for each epoch even.
Testing the mitigation (brute forcing images)
To check I built this basic brute force script, which just creates a random pixel image and then runs it through the new model. This test was done directly against the model, not via the slower HTTPS image upload API.
## Brute force experiment
## Is it now feasible now to guess a random husky via brute force?
attempts = 100000
current_best_score = 1e-100

for i in range(attempts):

    if (i % 10000) == 0:
        print(f"Progress... #{i}")

    ##create a random image
    candidate_image = np.random.random([1, NUM_PX, NUM_PX, 3])

    result = model.predict(candidate_image)
    score = result[0]

    if score > 0.5:
        print("Found a random husky. Try #" + str(i))
        plt.imshow(candidate_image[0])
        break

    if score > current_best_score:
        current_best_score = score
        print("New best score: " + str(current_best_score))
With the additional training we performed, it seems quite difficult to “guess” a husky picture now.
I performed about 100000 tests and the highest score achieved via random pixels was about 30% now - still a bit high so I should probably add a few more “random pixel” adversarial examples.
API throttling and rate limiting
Throttling the web server image upload API (which queries the model) is another good mitigation. I am using nginx as API gateway and rate limiting can be setup in the configuration file of the web site. See more information on the nginx documentation for rate limiting.
Conclusion
That’s it for the first round of attacks. I hope you enjoyed reading and learning about this as much as I do. I learned a lot already and am eager to dive learning smarter ways of coming up with malicious/adversarial examples.
Appendix
These are the core ML threats for Husky AI that were identified in the threat modeling session so far and that I want to research and build attacks for.
Links will be added when posts are completed over the next serveral weeks/months.
- Attacker brute forces images to find incorrect predictions/labels (this post)
- Attacker applies smart ML fuzzing to find incorrect predictions
- Attacker performs perturbations to misclassify existing images
- Attacker gains read access to the model - Exfiltration Attack
- Attacker modifies persisted model file - Backdooring Attack
- Attacker denies modifying the model file - Repudiation Attack
- Attacker poisons the supply chain of third-party libraries
- Attacker tampers with images on disk to impact training performance
- Attacker modifies Jupyter Notebook file to insert a backdoor (key logger or data stealer)
- Attacker uses Generative Adversarial Networks to create fake husky images